Table of Contents
Introduction
Company information is an important part and represent customers in foreknown. Companies receive offers and place orders, which in turn are implemented in projects and made transparent to companies via regular reporting. Last but not least, companies receive invoices for work performed, including detailed activity reports. Therefore, it is important that companies can be managed in foreknown with their address data, payment terms and contact persons.
Note: Companies are assigned a type in foreknown, which can be "Customer", "Supplier" and "Other". However, for foreknown, only companies with the type "Customer" are considered for further processes such as offers and orders. Companies that do not have the type "Customer" are currently only visible in the company management dialogs.
Company management is accessible via the "Companies & Contacts / Companies" menu item for users with the "Account Manager" role.
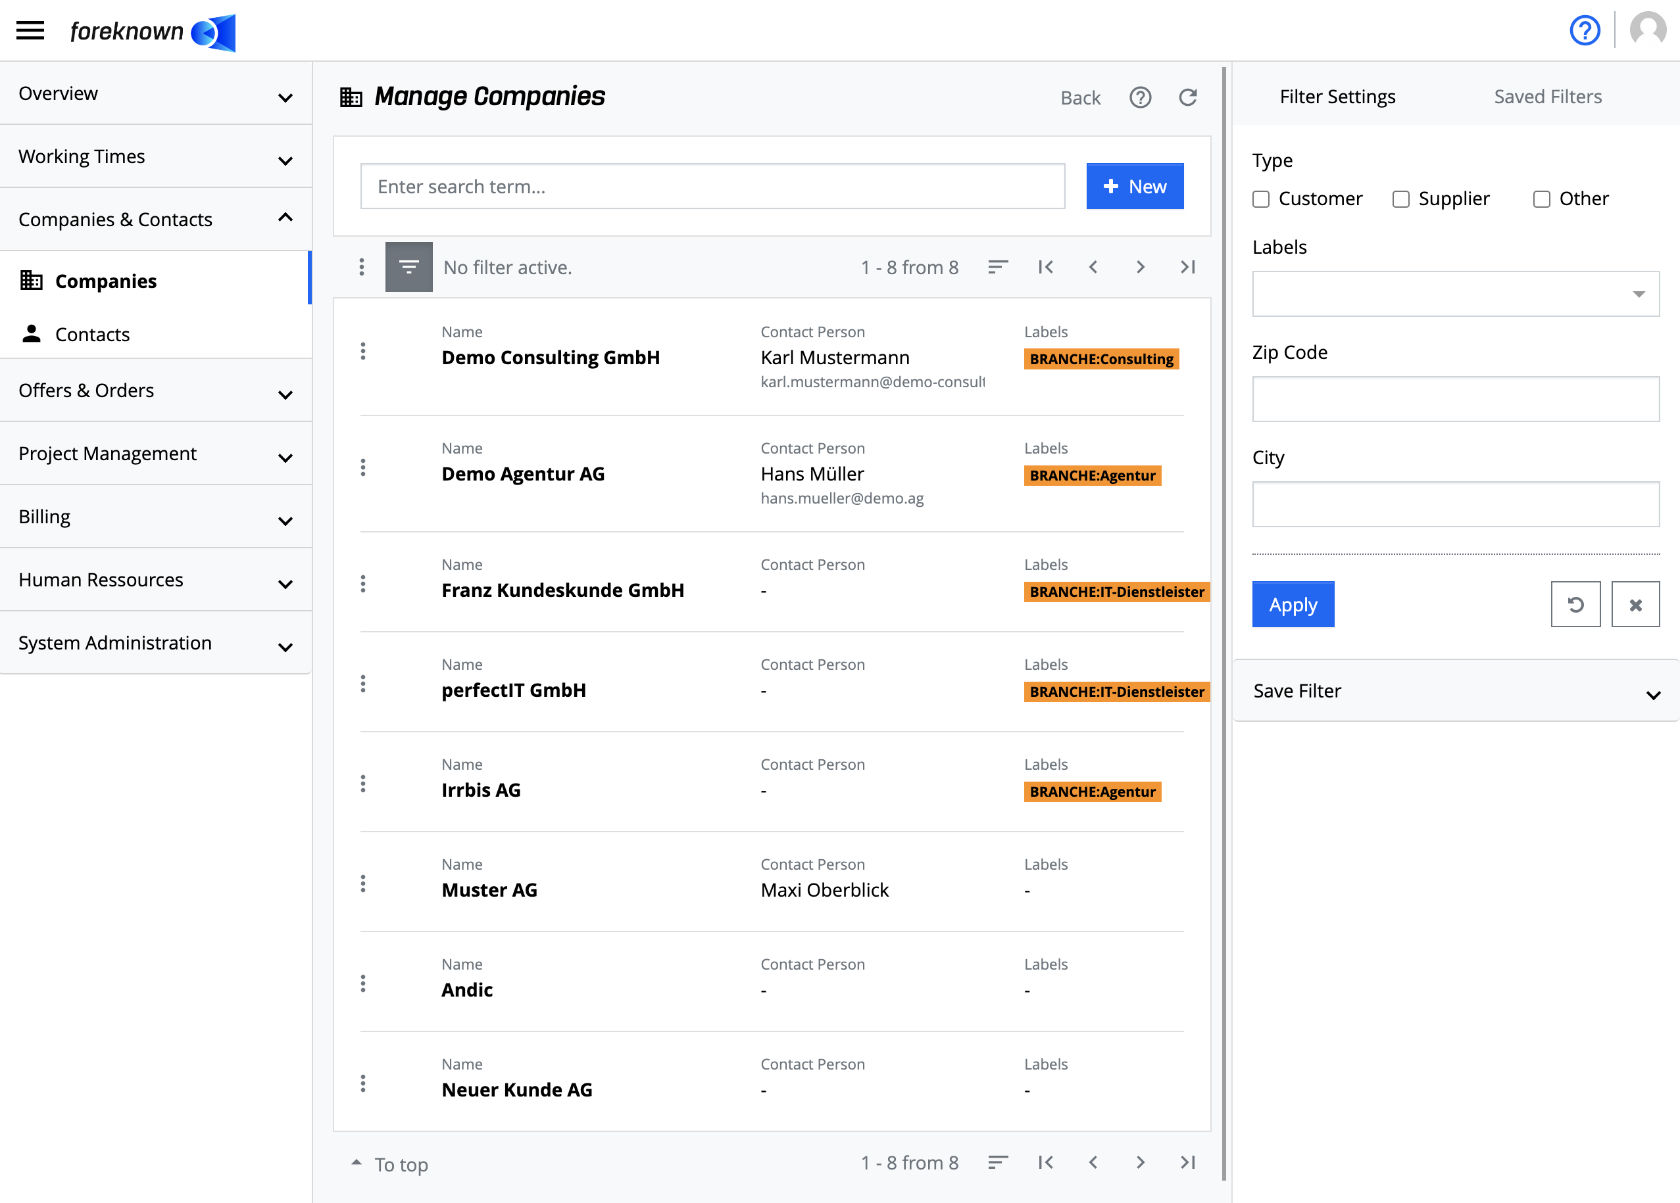
Search Company
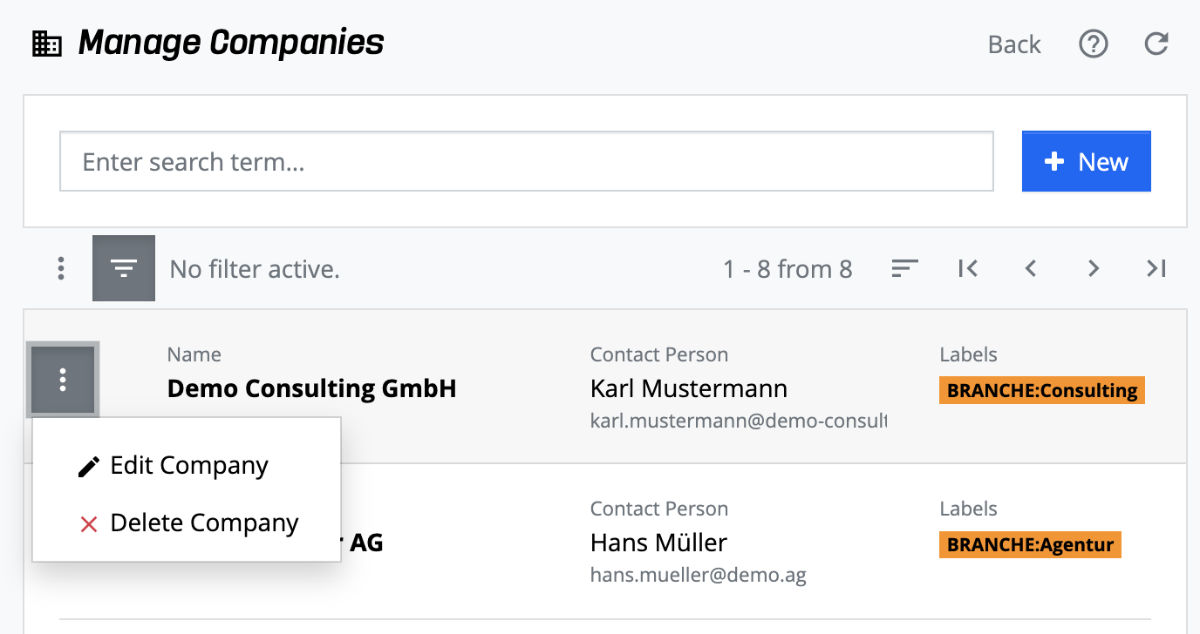
In the upper area of the company management is the search field and the "+ New" button (see also Create Company). Below this area all already created companies are displayed in form of a scrollable, filterable and sortable list.
If you enter a search term in the input field, the list will only show the companies that contain the entered search term in their name or company ID. In this way, individual companies can be found and edited quickly.
Filter Companies
In addition to the search function, the company management also offers a filter dialog. In foreknown, a filter dialog is always located as a fold-out dialog on the right-hand side. The filter dialog can be expanded and collapsed by clicking the button with the three dashes on the left above the list.
The company management offers the following filter settings:
- Type: Filter by one or more company types (customer, supplier, other).
- Labels: One or more labels can be selected. All companies who have been assigned one of the selected labels will be displayed.
- Zip Code: Any part of the addresses zip code
- City: Any part in the name of the city
The "Apply" action displays all companies in the list that match the filter criteria. The "x" action removes all filter settings and the list shows all companies again. The "Reset" action (symbol: arrow in circle) discards all changes that may have been made to a saved filter.
For general information on the filter options, see also the chapter Basics: Filters.
Create Company
To create a new company, click on the "+ New" button located at the top right of the search box. This button opens the popup dialog "Create Company".
The properties are separated via tabs into four areas:
Basic Data
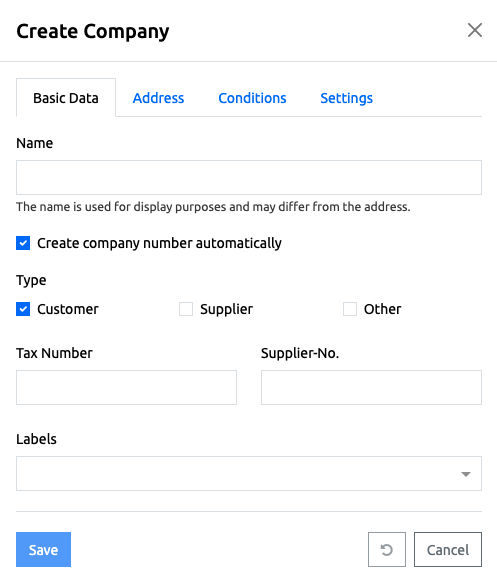
- Name: Unique name of the company.
- Flag "Create company number from number range": Determines whether the company number is generated automatically from the number range for companies or whether it should be maintained manually for this company.
- Company Number: This field only appears if the above flag has been deactivated and manual entry is therefore required. Please note that the number must be unique and must not conflict with the number range.
- Type: A company can be a "Customer", "Supplier" or "Other". But only companies of type "Customer" will be considered in processes like the creation of offers, order, and invoices.
- Tax Number: The customer's tax number can be entered in this field, e.g. for invoices for foreign customers.
- Supplier Number: The supplier number provided by the customer can be entered in this field, e.g. as a reference on invoices for this customer.
- Labels: If required, you can assign individual labels to the company to categorize it more precisely, e.g. Status:Lead to indicate that it is a potential company. The labels can be freely assigned.
Address
- Company Name: Name of the company address
- Address Suffix 1: Optional; 1st line for any suffix to the address, displayed below the department.
- Address Suffix 2: Optional; 2nd line for any suffix to the address displayed below the department.
- Street and House Number: Street and house number of the company address
- Zip Code: Zip code of the company address
- City: City of the company address
- Country: Drop-down list with all countries to select the country of the company address.
Conditions
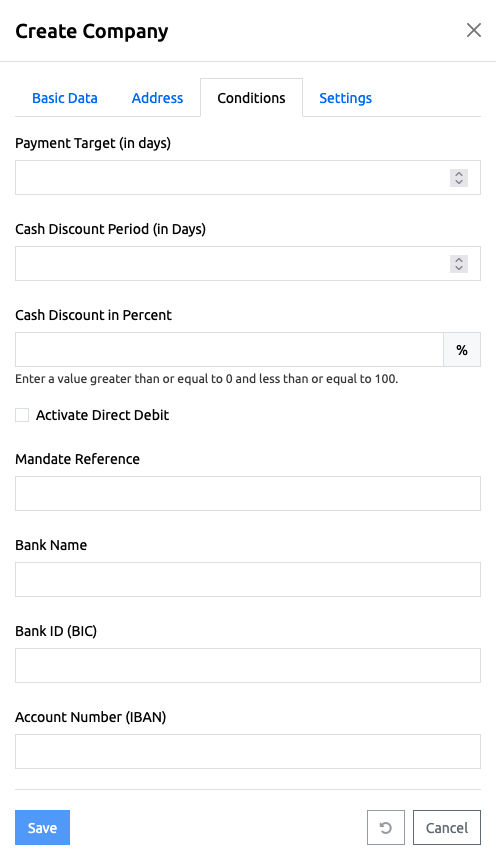
- Payment Term (in days): Number of days after which an invoice is due.
- Cash Discount Period (in Days): Number of days after cash discount is not available.
- Cash Discount in Percent: Value of the cash discount in percent
- Activate Direct Debit: Defines for the company that invoices are created with the payment method ‘Direct debit’ as standard.
- Mandate Reference: Contains the mandate reference which, in combination with the creditor identification number, uniquely identifies the mandate on which the direct debit is based. the mandate on which the direct debit collection is based.
- Bank Name: Contains the name of the bank to be used for the direct debit procedure.
- Bank ID (BIC): Optional; contains the unique ID of the bank (BIC) to be used for the direct debit procedure.
- Account Number (IBAN): Contains the account number (IBAN) of the account to be used for the direct debit procedure.
Settings
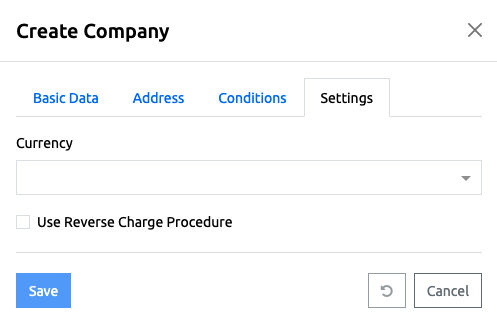
- Currency: The currency in which offers, orders and invoices are created for the company.
- Flag "Apply reverse charge procedure": Determines whether invoices for this company should be created using the reverse charge procedure and therefore only allow a value-added tax rate of 0%.
With the action "Save" a new company is created. With the action "Reset" and "Cancel" the entries are discarded and in case of the action "Cancel" the dialog is closed.
Update Company
The basic master data of a company can be edited via a popup dialog. This is opened by clicking on the action menu (the three dots on the left of the list) and selecting the "Edit Company" action.
Via the "Update Company" dialog essential but not all properties of a company can be changed. See also the description of the Create Company dialog.
Via the action menu the action "Delete Company" can be called. A confirmation dialog opens, which must be confirmed with the action "Delete".
Clicking on the line of a company (not on the action button) opens the companies detailed dialog. There, the master data is displayed.
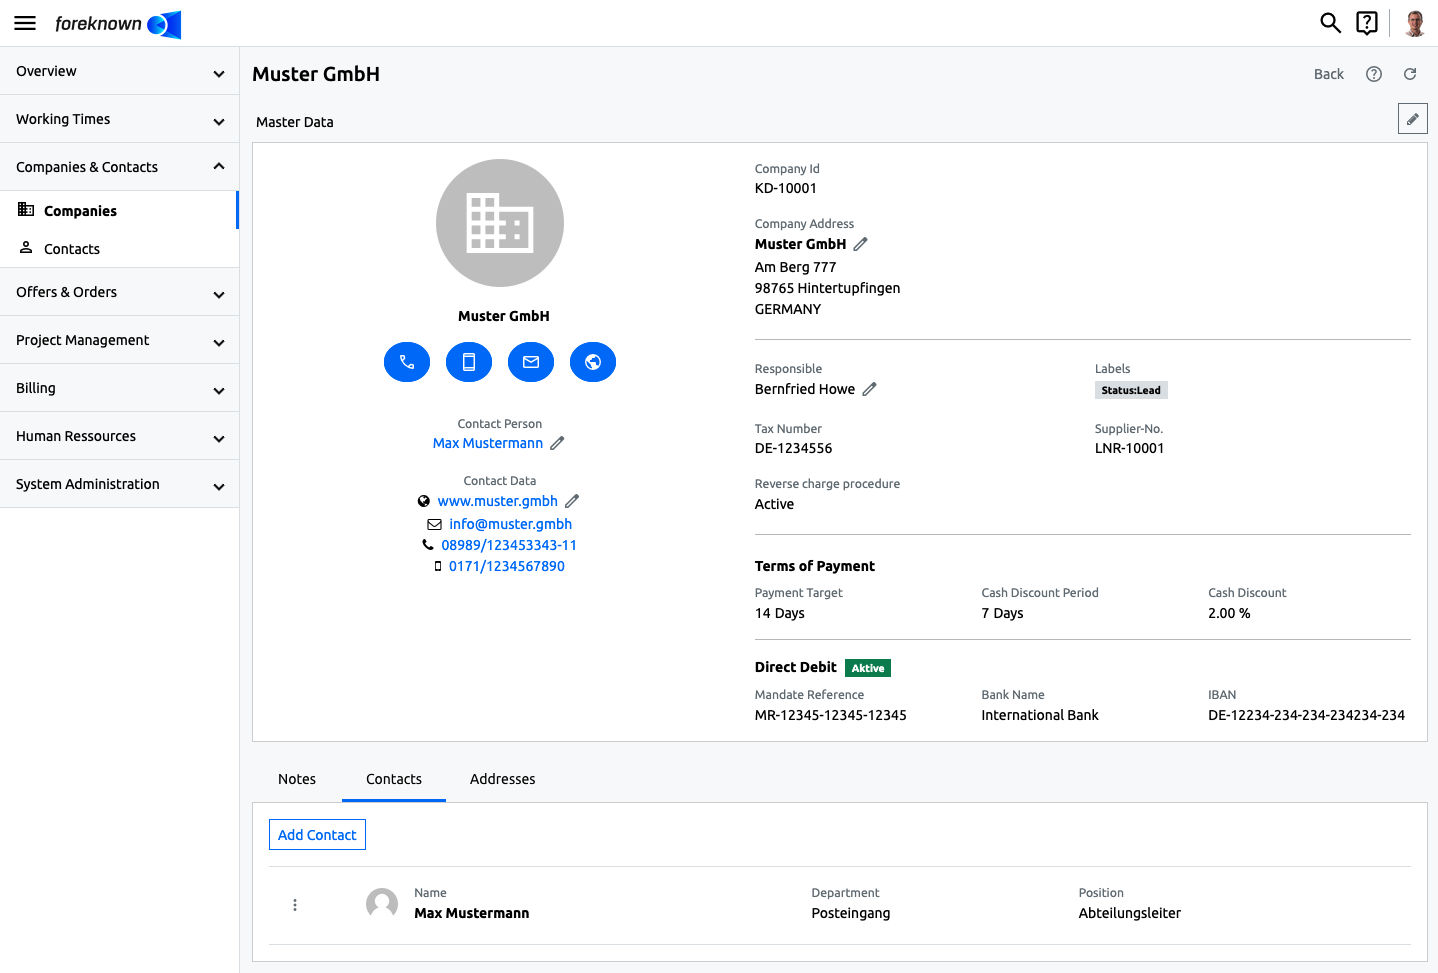
At the top right you will find the button with the pencil icon, which opens the master data dialog as a popup. In addition, the company address and the contact person can also be edited directly in a popup dialog using a small pencil icon.
Below the master data, three tabs "Notes", "Contacts" and "Addresses" are offered, which manage further information for a company and are described below.
Notes
Notes can be noted on a company, e.g. from communication via telephone or e-mails, in order to document important information chronologically. Since notes are used in many areas of foreknown, you can find a detailed description of this functionality at Getting Started / Basics / Notes
Contacts
Contacts can be stored for a company. The "Contacts" tab displays all contacts that have already been assigned. Additional contact persons can be added, existing ones removed or edited.
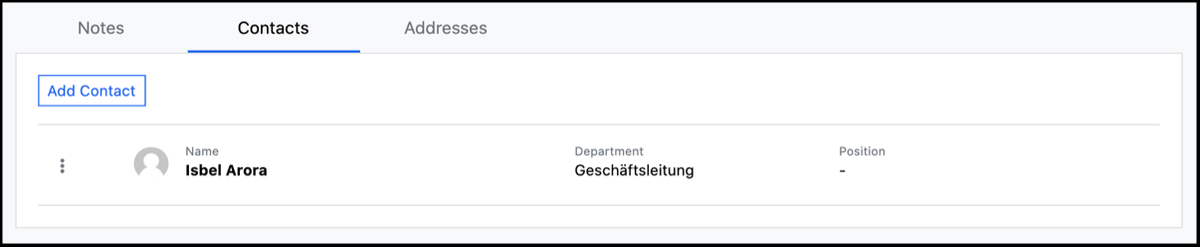
The "Add Contact" action opens the corresponding pop-up dialog.
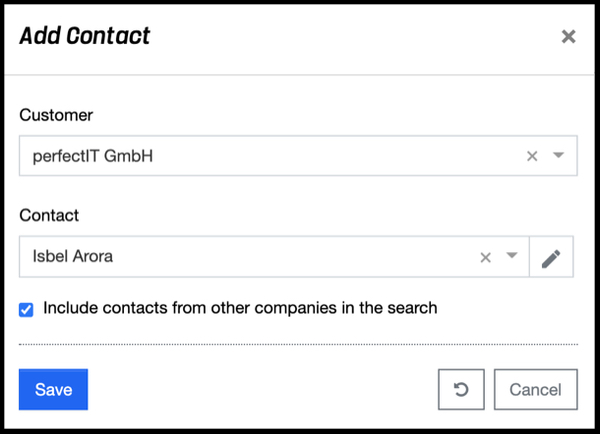
The company of the selected company is already selected. In the "Contact" selection box, an existing contact of the company can be searched for by entering a name. Furthermore, a new contact can be created directly. To do this, simply click on the "+" symbol to open the "Create Contact" popup dialog.
The creation of a contact is described in more detail in the chapter "Companies & Contacts / Contacts".
The action menu with the action "Edit Contact" opens the "Update Contact" popup dialog where all properties of a contact can be edited.
Via the action menu with the action "Delete Contact" the assignment of a contact to a company can be removed again.

If you set the "Delete Contact completely" checkbox, not only the connection to the company will be removed, but also the contact itself.
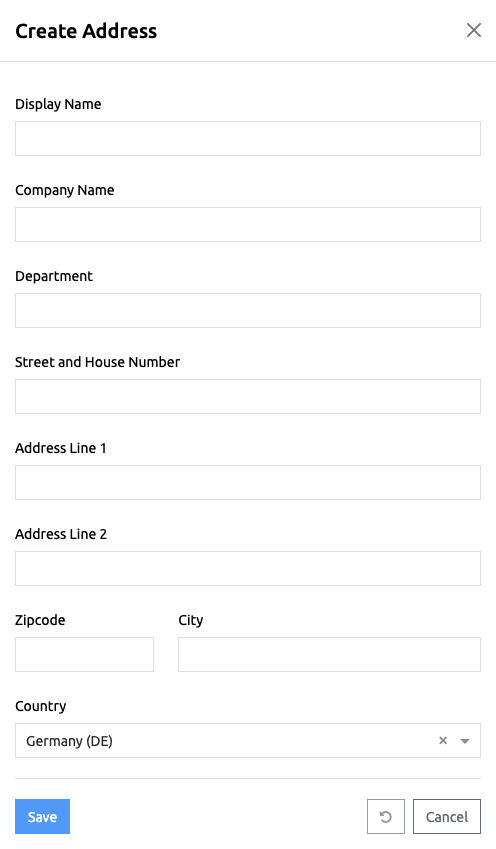
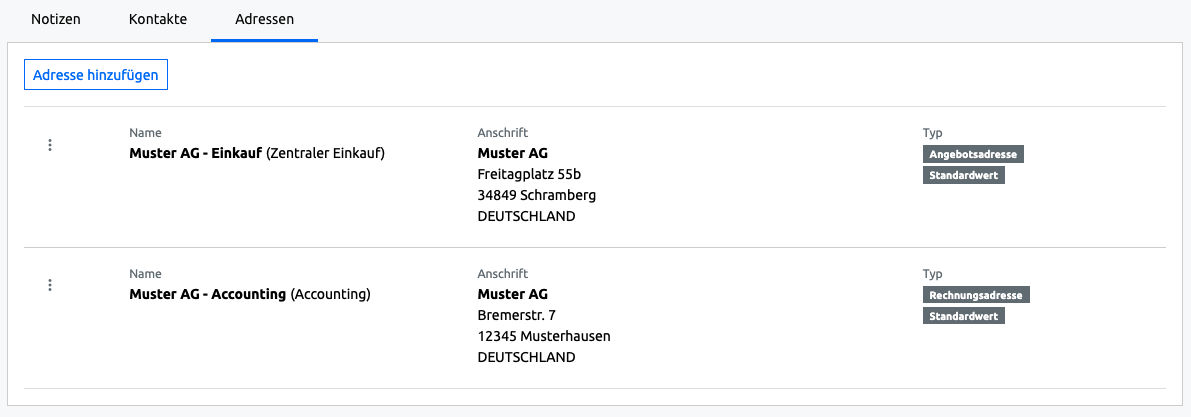
Addresses
In addition to the standard company address stored in a company's master data, a company can have additional addresses that can be managed via an "Addresses" tab.
The action "Add Address" opens the corresponding popup dialog.
The following address data can be entered via this dialog:
- Display Name: The display name for the address.
- Name: The name of a person or a company.
- Department: Optional; Name of a department of the company.
- Street and House Number: Street and house number of the company.
- Address Line 1: Optional; 1st line for any suffix to the address, displayed below the department.
- Address Line 2: Optional; 2nd line for any suffix to the address displayed below the department.
- Zip Code: Zip code of the company.
- City: Name of the city of the company.
- Country: Drop-down list with all countries to select the country to the address.
With the action "Save" the changes to the company address will be saved. With the action "Reset" and "Cancel" the entries are discarded and in case of the action "Cancel" the dialog is closed.
The action menu with the action "Edit Address" opens the "Update Address" popup dialog, where all properties of an address can be edited. The dialog is identical to the "Create Address" dialog.
The "Set Address Type" action opens the dialog of the same name and a type and, if necessary, a default behaviour can be defined for the selected address.
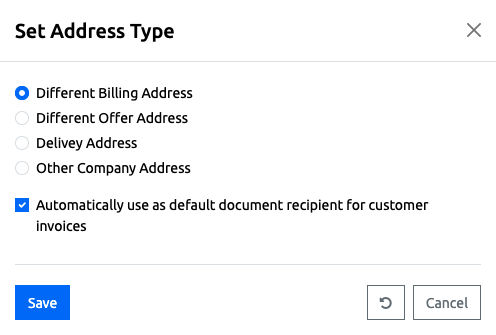
- Different Billing Address: Addresses of this type can be used as a different document recipient for an invoice. for an invoice. If the flag "Automatically use as default document recipient for customer invoices" has been set, this address is automatically preset as the document recipient when an invoice is created for this company.
- Different Offer Address: Addresses of this type can be used as the different document recipient for offers. If the flag "Automatically use as default document recipient for customer offers" has been set, this address is automatically used as the document recipient when an offer is created for this company.
- Delivery Address: Addresses of this type can be used as delivery addresses for offers, orders and invoices. and invoices. If the flag "Automatically use as default delivery address for offers, orders, invoices." has been set, the delivery address is already pre-assigned when a corresponding document is created.
- Other Company Address: For other addresses of the company that have no special meaning.
An address can be deleted again via the action menu with the action "Delete Address".